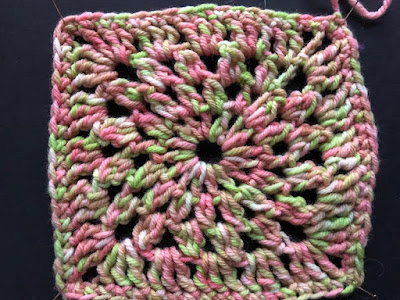
Koolaid dyeing is safe, fun, and quick. If you you find you enjoy dyeing with Koolaid, the process is not so different than with commercial dyes, but you are safe to dye in the kitchen with kitchen equipment. The yarn for the granny square in the picture was dyed with Koolaid in this process.
You'll need:
- A metal, ceramic or glass bowl to soak the fibers
- A counter to spread out the fiber for painting
- A steamer (bamboo, or a double boiler type steamer is better than the foldable metal steamers that go inside a pot.)
- Plastic spoons and small plastic containers for mixing up the liquid dye
- New/clean foam brushes in 1-2" widths
- Plastic wrap or lightweight plastic sheeting
- 1-4 ounces of yarn, roving, loose fleece or 1 yd+/- piece of fabric
- Koolaid or similar brand of unsweetened drink mix, in desired colors, 4-8 packets or so
- White vinegar, maybe 1-2 cups
1. Fabric, yarn (skeined), roving and loose fiber can be dyed in the same way. To prepare for dyeing, soak fibers in a bowl with hot tap water and vinegar for about 20 minutes. Use about 1/2 cup vinegar to a gallon of water. New fabrics require simmering with some dish soap to get rid of stabilizers before soaking.
2. Make a paste of the Koolaid, by adding a small amount of hot tap water and mixing til no more powder is left. This is the most intense color; by adding more water you get more dye, but lighter color. A good starting point is one package of Kool-Aid per one ounce of fiber. Add just enough hot water to make a paintable consistency.
3. Squeeze out as much soak water as you can, and lay out wet fabric, yarn or fiber in a thin layer on a sheet of plastic wrap. Using a foam brush, apply the dye directly to the fiber. This method allows you to use as many colors as you wish. Work the dye into the fiber and flip it over to be sure it has saturated both sides.
4. Fold the fiber up in the plastic sheeting and fold securely into a packet. Use tape to secure it if needed. Put the packet in a steamer and steam for 30-45 minutes, depending on how full the steamer is. This sets the dye on the fiber.
5. Remove packets from the steamer and let cool for a bit. Put the dyed fiber in a bowl with hot water and rinse til no more dye rinses out. Hang to dry.
This process is the absolute easiest and safest way to put color on fiber. Plus, you can use several colors at a time for interesting effects. It's safe to do with kids, and safe to do in the kitchen with kitchen equipment.
The downside to this process is it takes a lot of Koolaid to get a dark color, and you can expect all the flavors to give you candy colors. Mixing colors to get a new color is hit and miss. And, it isn't consistent, from one batch to another. If you want to do enough yarn or fleece for a bigger project, you want the colors to be consistent.
Commercial dyes lend themselves to consistency, and if you are ready to level up to professional results, go on to the next installment of my Dyeing in a tiny bathroom series.


This comment has been removed by a blog administrator.
ReplyDeleteThis comment has been removed by a blog administrator.
ReplyDeleteThe absolute easiest dyeing you can do at home is tie-dyeing. All you need is a tie-dye kit, some fabric, rubber bands, and water. Simply twist and bind the fabric with rubber bands, apply the dye, and let it sit for several hours before rinsing. The result is a colorful and unique pattern.
ReplyDelete